Showing posts with label bicycle. Show all posts

Saturday, June 27, 2015

Riding the Super Course: The 2015 Gran Fondo, Ellensburg

As I was finishing up the drivetrain for the Super Course, I learned of an intriguing ride, which I thought suited the Super Course: The Gran Fondo, Ellensburg. I especially liked the idea of riding East of Snoqualmie Pass in a rural and forested area with the potential for some nice views. I'm not so familiar with the dry terrain just East of the Cascades - a nice adventure, just before Father's Day, I thought. I saw that the ride would be 90 miles (36 gravel), 7,500 feel of climbing, starting and finishing in Ellensburg (elev. 1,500 ft), and topping out at about 5,200 ft.
It would be an excellent test. Those hilly parts between about mile 31 and mile 67? All gravel. That first steep hill? It seems to climb about 2,700 feet in about 6 miles, that is, an average of about 9% for 6 miles, plus some more climbing before you get to 5,200 ft. That would be really hard - could be a sufferfest.

Trying to ride with élan and well within my limits, I finished in about 6 hours and 20 minutes, about 17% off the time of the first person to cross the line (results). I lost about 10 minutes fixing one flat at about mile 70 on the road, due I think to my poor choice of inner tubes (see earlier post).

Bummer, but after 5 hours, who cares. And, by getting off the gravel safely, I can't be too disappointed. It was all good.

The Super Course in Action, Gran Fondo, Ellensburg, June 20, 2015

Other than the flat tire and three or four scary moments on the downhills, the Super Course rode very well, doing well, but not great, on both the road and on the gravel. Could any bike be great on the gravel climbs, on the gravel downhills, and on the road? 

I rode with 60 psi in both the front and back wheels. (For the ride, I weighed in at about 158 lbs.) I think I could have ridden with maybe 40 psi in the front and 45 psi in the back but I wanted to avoid pinch flats and I didn't have confidence in the tires and rims at those pressures. As best I can tell, the wheels came out of the ride exactly as they went into it. And, the seatpost? It did not budge. 

On the steep climbs I had to stay seated to get traction; standing mostly didn't work. On the downhills I generally let the bike run, slowing conservatively into the turns. Thanks to the Reynolds 531 steel and the wheels, the ride was all things considered pretty smooth, except for some brutal washboard on some of the very steep downhill sections. On those sections I screamed to myself "Slow down, right now, dude." 

The route was very well designed and marked, and the ride was superbly run by Vicious Cycles. Very impressive. The vibe was friendly albeit somewhat serious, a combination which I appreciated. This was my first Gran Fondo. It reminded me somewhat of a cross-country ski Loppet, which I take to be first a collective celebration of life and second, for some, a competive test of fitness and skill. 

Specialized came to this Gran Fondo with a trailer of bikes, which you could sign up for and borrow for the ride, including the  Crux Pro Race UDI2 (MSRP $7,000.00) and the Diverge Carbon DI2 (MSRP $8,500.00).  These and similar very cool bikes can evidently be ridden on pretty much anything. I gather that lots of people wanted to try them out.

I believe these modern bikes weight about 18 lbs. or a little less. I think the Super Course weighs about 25 lbs., though I have yet to check on an accurate scale. Given an individual's fitness level and weight, its interesting to consider what kind of performance advantage these modern bikes might have over the Super Course. Not just in terms of weight but also in terms of the various rolling efficiencies in those carbon wheels, tubular tires, drive train, braking, and  so on. And, given an individual's skill level: How much faster on the downhills are these modern bikes compared to the Super Course? In whatever manner these questions are answered, I don't think they take away from the pure fun of riding whatever machine you happen to have.  Still, they are questions that I think are important, since they get to the heart of the cycling experience - how efficient can one be on two wheels?

In any case, I wonder if someone, not too unlike me, might try to fix up one of those bikes forty years from now, in 2055. What questions might they have? 

If you look carefully in the video below you might see those Specialized bikes and the Super Course in action, if only very briefly! You'll see the group heading West at the beginning of the ride, going about 20 mph I think, into a 10-15 mph headwind on a mostly flat road from Ellensburg to Cle Elum. Thank you Viscous Cycle on Facebook


Whoosh
Posted by Vicious Cycle on Saturday, June 20, 2015

What's Next?

I started to worry about the the seatpost and the seatpost bolt. Taking the original seatpost out was extremely hard. When I removed the original seatpost by twisting and pulling - and gritting my teeth against a sore back - bits and shavings of aluminum from the post came off. I didn't understand why.

The seatpost bolt is bent too.  Is it supposed to be bent?  I presume not, but I don't know.

The Seatpost, the Seatpost Bolt, and the Frame: A Bit Worrisome
Carrying on, I measured and remeasured the seatpost diameter and decided that it was 26.6 mm in diameter. So, I ordered a new seatpost from Niagra Cycle (Kalloy Uno 26.6 x 350mm Silver, about $15.00) and installed it. The new seatpost allowed me to get the seat level, just how I wanted it. The new seatpost goes in fairly well, but I can't tighten the seatpost bolt down solidly. It's tight but not tight like I think it should be. I think in fact that the big "R" nut kind of bottoms out at the end of the bolt. This can't be good.

I haven't found good information on the correct diameter for the seatpost. While this table looks promising, I don't think it covers my Super Course and I believe that I've read somewhere that the seatpost sizes varied a good deal on Raleigh bicycles.

I ask the professionals at Recycled Cycles for help. What's going on here? The mechanic tells me that that seatpost is likely too small. That statement confounds my understanding since the 26.6 mm seatpost was a pain in the ass to get out. And, you recommend and even bigger seatpost? You don't understand. But, then I see my mistake: I was thinking about the post in isolation whereas I should have considered the seatpost in relationship with the frame - the seatpost, the bolt, and the frame comprise a system. Those three pieces need to work together.

In the photo above, notice how close the two sides of the frame are to each other. The mechanic saw that immediately. She tells me that I likely need a larger seatpost and that I should carefully bend the frame apart with a screwdriver so that there is more room for the seatpost to go in. That would prevent the nut from bottoming out on the seatpost bolt.

So, I think I will order a 26.8 mm seatpost and try (Kalloy Uno 26.8 x 350mm Silver, about $15.00 at Niagara Cycle). That said, the thought of bending the frame with a screwdriver makes me nervous and the current seatpost setup has yet to move, despite some hard riding. What will I do if I crack the steel or a piece of steel brakes off? But, should I leave well enough alone? Probably not.

I put tape on the handle bars. I used white because I had white tape in my box of parts. It got dirty faster than I expected so I think I'll try to avoid white in the future.

In any case, the tape is temporary, since I have learned about Shellacing handlebars. The hemp string sounds like an interesting craft material too (see Rivendell Catalog #20 and the brilliant video by Brian Trout who also makes cocktails during two intermissions). I'm going to give that a whirl (not the cocktails) over the summer and put the white tape back in my box of parts. Shellacing will also give me an excuse to visit Aaron's Bicycle Repair Shop for the first time, buy some colorful cotton bar tape, and thank them for their excellent website.

I need to do something about the brake hoods. They are hard plastic and the edges are quite sharp. So sharp in fact that I have scrapped and cut one of my fingers while pulling up on the handles. I assume that 40 years ago they were soft but that the material has hardened with age. Not sure.

Brake Hoods, Not so Good 

Looking forward to the autumn, I expect that I will put on some chrome fenders. I found these fenders on a bicycle that was left on a nearby driveway with a FREE sign on it. They were rusty pieces of junk until I got out my soap, water, and tinfoil. I have no idea why I picked up that bicycle and kept the junky fenders and a few other parts but I'm glad I did - perhaps herein is a small lesson of some sort.

The 27 inch Chrome Fenders Wait for Autumn
These fenders are meant to fit on 27 inch wheels. I've read somewhere that such fenders are hard to find. But, all is not straightforward - unfortunately, the fender stays are too short for my setup and the hardware for attaching the fenders to the bicycle is rotten, pretty much rusted out; I'll have to figure out what to do about that.

Beyond these details, after about 120 miles on the bike, I am very happy with the Super Course. That said, I may decide to work on the wheels. Perhaps a Shimano 105 7-speed hub with a 12-32T cassette would provide more flexibility and reliability and fit my 120 mm frame spacing without too much "cold forging," which I believe is the technical term for bending the frame. I happen to have that cassette and hub in my box of parts.  Or, maybe there is a 7-speed 14-32T freewheel out there that will fit? But, that won't address my doubts about the reliability of the hubs.

For more reliability and safety, perhaps I should go with a modern rear derailleur, keeping the friction shifters of course.  No need to give those up. And, I think I've read that a modern 9- or 11-speed derailleur will work fine on a 7-speed cassette with friction shifting. Could that really be true? Maybe one of those new Shimano 105 or Ultegra ("pro proven") derailleurs would be the cat's meow. 

Last question, for now: Is this still a Raleigh Super Course or is it something else? I guess it is a Super Course, upgrade. Whatever it is, so far so good.
The Raleigh Super Course Upgrade, Version 1.0, June 23, 2015

The Process

To get to Version 1.0, my first step was to take off the kick stand and the back rack. Then, I loosened the seatpost bolt and yanked the seatpost out. This was extremely difficult because (I think) the seatpost is 2 mm too small and the frame has been bent too much to hold the seat post. More on this below.

Unfortunately, I rip the Brooks saddle in this process (the leather turned out to to be very delicate). I decide to throw it away. I wasn't careful enough. I feel bad. Next time, I'll take the saddle off before trying to pull the seatpost out.  I'm disappointed because I was looking forward to riding on the saddle. I've never had a Brooks saddle, but I've read that they can be very comfortable. I'm skeptical. By how they look, I don't see much comfort, but then again Brooks has been manufacturing saddles for a long time.

I then take off the derailleurs, the cables, the shifters, the brakes, the brake handles, the handle bar tape, and the peddles. I leave the chain and the crank on. With soap and water and tinfoil I clean all the bits and pieces.

Yes tinfoil - this video taught me how to remove rust and clean bicycle things - geeky, but very, very helpful. Fortunately, while there is some rust, there is not nearly as much rust as Ryan's Super Course and my bicycle does not have pitted chrome.

The Raleigh Heron, Nottingham, England. So Regal, So Colorful

I take off the front fork and in the process I loose a bunch of ballbearings. I feel bad. I must be a poor mechanic; not careful enough, not focused enough. I worry that the ballbearings are rare and I won't be able to replace them.

After reading Sheldon Brown, I feel a little bit better. He tells me that I need to put 25 x 5/32 inch loose ball bearings into each race of the headset. I learn that 5/32 inch bearings are not rare. The headset parts seem well-made. Everything fits together cleanly and works. I guess Raleigh knew about steel parts and its good to know that ballbearings have names. I imagine: "What are your ballbearings? Mine are called 5/32 inch."

On Sheldon Brown's recommendation, I replace the AVA "death stem" with a stem that I have in my box of spare parts. Interesting discussion on the AVA stem can be found on bike forums.

I clean the parts as best I can. I wonder "how much time should I spend?" Should I get out a magnifying glass? I could spend more time but decide not to. I oil the moveable bits and pieces. Everything seems to work. I buy new cables and cable housing and put it all back together. The eyelet thingies on the frame for the cables and the brake hardware worked beautifully.

Notice the two eyelet thingies on the top tub near the stem for the back brake cable.  Beautiful. It makes the cable go straight. I can't help but wonder "How was the extra welding work justified? Was there a fight? We only need one. No - two. Marketing advantage. No - one. Cheaper."

Two Eyelet Thingies on the Top Tube for the Back Brake Cable
The steel rims needed to go. I have some old 27 inch rims from a Panasonic Sport bicycle (mid eighties maybe) that I found on a driveway nearby with a FREE sign. These wheels have aluminum rims but the hubs are steel. Anyway, I put them on the frame and it all fits. I am pretty sure that the back frame spacing is 120 mm.

I tighten stuff up, and go for a ride. And, the bike feels good. Its bouncy but not too bouncy. When riding somewhat fast, at perhaps 23 mph, it feels even better. It's stable. It's smooth. It just seems to want to keep going. The derailleurs work quite well.

The center pull Weinmann brakes, however, are terrible, and I can't figure out how to use them well. I can't modulate the application of pressure, and my braking does not feel controlled. Basically, the brakes are either on or off. When the front one is "on" I worry that I'll fly over the handle bars. When the back one is "on" the wheel tends to lock up. Not much fun. I change the break pads but that doesn't seem to help.

I give up on the Weinmann brakes and buy a pair of Tektro R559 Long Reach Road Breaks (Silver, 55-73mm) for about $50.00. These brakes are dual pivot, side pull brakes. While I'm disappointed that I don't get to use the Raleigh's center pull hardware, which I think is beautifully designed, I have found these brakes to work very well.

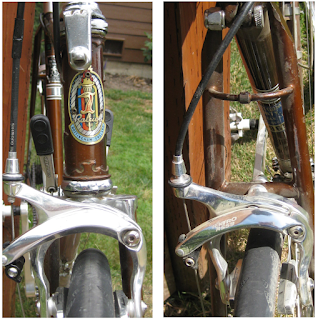
The Front and Back Dual Pivot Side Pull Brakes

Back to the wheels. The original steel wheels were heavy and evidently braking on steel is not so good. I noted that the freewheel is an Atom freewheel and I did not have the correct freewheel remover, so I figure out which one to buy and order it (Park Tool FR-4).

Interestedly, you need to remove the axle before you can use the freewheel remover. Once I get the freewheel off, I put the axle back in. I put the wheel on my truing stand. Then, I put some penetrating oil into each spoke nipple and take the spokes out. I do the same for the the front wheel. No idea why, but I saved the spokes and the nipples and I put them in my box of parts.

Liberated from the spokes, I clean the hubs. Then, I clean and repack the bearings with grease.  Sheldon Brown tells me that a tenth of a turn on the bearing cones can make a big difference, making the cones too loose or too tight.  I try 5 or 6 times on each hub to get the right tightness. I also remember someone telling me many years ago "a little play is better than no play."  Still, I'm unsure if the bearings are too tight or too loose.  My cone wrenches seem too loose for the axle locknuts on the Super Course.  This requires me to anticipate the effect of the tool - there's a kind of indirection because the wrench does not fit so well with the locknuts.

Careful inspection of the front hub shows that the flanges are aluminum but the bit in the middle that attaches the flanges is a different material.  In other words, the front hub as two flanges that are somehow pressed into the middle piece through which the axel goes.  The back hub, on the other hand, is one piece of aluminum.

I buy four new rims from Niagara Cycle: Sun Alloy Rim 27 x 1" M13 Polished 36 Hole Presta Valve (about $20.00 each). The extra rims were insurance against me breaking one, and I've found that it is satisfying to have a few extra parts around, hidden away waiting for some project.

Twenty-seven inch (630 mm) wheels seem suited to the Super Course. Could I go with 700C (622 mm) wheels? Yes, I do believe that I could.  But, something seems aesthetically wrong with that move. That changes the bike too much; a whopping 8 mm. I note the contradiction: I felt it acceptable - though not great - to put on those new side pull brakes.

I measure and remeasure the hubs and once the rims arrive I measure and remeasure the Effective Rim Diameter. I plug my measurements into a spoke calculator and it tells me that I need 54 x 295 mm spokes plus 18 x 293 mm spokes. Each wheel has 36 spokes and I'll go with 3-cross lacing.

Should I trust my measurements? I do and buy DT Swiss Competition Double Butted Spokes (2.0 mm - 1.8 mm - 2.0 mm) and brass nipples (about $120.00). Those spokes are also 14/15/14 gauge spokes; that is, 14 gauge is 2.0 mm and 15 gauge is 1.8 mm. Go figure.

I build the wheels. While I have trued wheels - at least I have tried to true wheels - since I was a 13 or 14, these are my third and forth wheels that I have built from scratch. I learned to build wheels last year from this utterly clear book: The Professional Guide to Wheel Building by Roger Musson. It's brilliant. Maybe ten years ago I read The Bicycle Wheel by Jobst Brandt. While I was inspired by the engineering theory, I wasn't able to absorb more than some general concepts. Musson's book, on the other hand, compelled me to work.

For wheels #1 and #2 (Mavic Open Sport, 700c, DT Swiss Competition Double Butted Spokes, brass nipples, Shimano 105 hubs), when I first took them out for a ride they pinged and tinkled. The spokes were wound up. They were twisted with tension. As they pinged the tension was released, so Roger Musson explains, and the wheels came a little bit out of true, which required re-truing. Since getting the pings out and re-truing, the wheels have been solid and comfortable. I ride them most every day. Given this experience, I had some confidence that I could build wheels, #3 and #4, for the Super Course.

For wheels #3 and #4, my major goals were, first, to get good radial trueness with the careful use of my nipple driver (for me, easier said than done, Roger); second, to avoid spoke wind up while making the spokes quite tight; and, three, to try to equalize the tension of those 36 spokes. (Its slightly more complicated.  On the back wheel I actually need to equalize the tension of the 18 spokes on each side. For the front wheel, true enough, the goal is to equalize the tension on all 36 spokes.) I think I was able to achieve these goals and the wheels are of descent trueness. I think they are pretty good. Still,  I do wonder: What is the weakest link?

I think it might be the hubs and the steel axles but I'm uncertain about how weak that link might be. Or, perhaps even with these old hubs, the weakest point remains the rim which I understand to be under tremendous tension. I don't know. I also wonder: How well do these 40+ year old hubs roll compared to more recent hubs?  How much theoretical and practical inefficiency do these old hubs cost me? Was it silly (or stupid) to build new wheels with these hubs? Or, are the hubs quite reliable, with long lives ahead of them? I have no idea. Perhaps, I should have asked someone.

The Front and Back Wheels

I bought two Continental Gatorskin 27 x 1 ¼ inch tires (32-630 mm) and I've been experimenting with tire pressure, inflating them in the range of 50 and 80 psi. For a fascinating discussion of tire pressure see All About Tire Inflation by Frank Berto.

What kind of tubes should I use? I had some 18-23 mm tubes around so I used those. This, however, was likely a mistake. I think the narrow tube size in the 32 mm tires does not go together - too much stress on the tubes. I need to figure out what kind of tubes would be most suitable, perhaps "cyclo-cross tubes," but I'm unsure what those are.

Excellent information on 27 inch tires is available here: Myth Busted "Thee are very few options for 27 inch tires." Thank you, again, Ryan. I am particularly interested in how the Schwalbe HS 159 tires (32-630 mm) and Kenda K161 tires (37-630 mm) might work. Something to perhaps consider in the future.

At this point in the "re-build" - if I may call it that - I took the bicycle out a few times and I like the ride. The wheels are firm but forgiving. The 32-630 mm tires are very comfortable (on my regular bike I ride 23-700C or 25-700C tires). The brakes work. My position on the bicycle feels good. I think I have plenty of room for fenders.

I inflate the tires to 75 or 80 psi. Then, I jump some curbs. I ride down a fairly steep rough gravel path and then lock the back brake and skid. I ride hard over bumps and on rocks. I check the wheels and they remain solid. As far as I can tell, they haven't changed a bit. Like I said, Roger Musson's book is brilliant.

What about the drive train?  I decide to replace it, mostly because I need better gearing.  Given my style of riding in Seattle, the 44/52T steel chain rings are shall we say "not so good."

So, I bought a new chain, a Sunrise 5-Speed Freewheel 14-28T (about $15.00), and the Velo Orange Threadless Bottom Bracket (about $60.00). For cranks and chainrings, I bought the Velo Orange Grand Cru 110 Fluted Double Crankset, 34/48T. The crankset was on sale (about $140.00).  The Velo Orange stuff is beautiful to look at and to handle.  It just seems to work, like the Super Course steel.

I note that if I can push a 48 x 14 (gear ratio 3.4) at 100 rpm I'll be going about 28 mph. That's plenty fast. Do I need a higher ratio? Probably not. Coasting down Simonds Rd NE or Juanita Dr NE for a little bit will be fine - in any case, the speed limit is 35 mph. I also note that 34 x 28 (1.2) will easily get me up Norway Hill, since most days I ride easily enough up the hill in a 39 x 24 (1.6) and some days a 39 x 21 (1.9) is fine. Will 39 x 18 (2.2) ever be a suitable training gear for Norway Hill? I doubt it - I'm getting old.  See the Gear Speed Chart.

I went with an axle spindle length of 118 mm because I read someplace that 118 mm typically works with the Velo Orange crankset.  Apparently, how the crankset interacts with the axle is as important as the shape of the frame. Good to know that.

On the basis of this article, I decide to buy 172.5 mm crank arms. (My regular bicycle has 175 mm crank arms.)  I imagine that I'll be spinning for sure on the Super Course.


The Velo Orange Crankset and the Threadless Bottom Bracket - Beautiful Stuff

To my relief, the Sunrise 5-Speed Freewheel fits onto the hub snuggly. I had feared that the threading on the "made in France" hub would not match today's ISO standard of the "new" freewheel. I worried that if I put the freewheel on I would strip the delicate hub threads and ruin my efforts on the wheel. Evidently, my "made in France" hub uses the ISO standard or is compatible enough that I don't notice.  Sheldon Brown discusses these matters. Still, I wish I knew more about threads and how to measure the "pitch" and "width" and whatever else needs to be measured.

I put penetrating oil on the cotter pins and followed this superb video, which taught me how to safety remove the pins without wrecking the frame or bearings.  I had a good time cutting the wooden block and drilling a hole in just the right spot. (Thank you Karen for the lovely hand drill. So many uses.) It worked and I got the steel crank arms off.  I put the wooden block back into my box of parts. Maybe I'll have a future need to deal with cotter pins.

On to the bottom bracket bearing cups. With more penetrating oil and by carefully using a crescent wrench I was able to get them both off.   I read that taking the right cup off can be very challenging and was reluctantly prepared for a trip to Recycled Cycles but I was able to get them both off quite easily. I think the trick was the very fine penetrating oil, since the edges of my big crescent wrench are pretty beat up.

Next up: The threadless bottom bracket. I watched this video five or six times. It took me a while to figure out what tool I needed (Park Tool BBT-9). I bought one of those and some Blue Loctite (I had sticker shock on that stuff). Visualizing the video, I tried it. It looked easy and it was.

Then, I put on the new crankset. I needed to buy a big allen key and I learned about "self extracting" bolt thingies for putting the crank arms on the axle.  Unlike the crank arm extractor, which I understand, I don't understand yet how the bolt thingies actually work but they do.

When I put on the new chain everything seemed to line up well enough. Phew - it worked.  I think to myself "I think I got lucky. How could all this stuff come together and work?"

I rode the bike a few times and it felt really quite good and I started to get to know its characteristics.

The shifting was excellent on the front derailleur. Even when the chain fell off, and it has fallen off a few of times, it was easy enough to get it back on the rings with the shifter. While it was bit rough on the back, it worked.  I get all five gears, but the 34 x 14T doesn't work so well. Too much chain flopping around. Perhaps with a little more adjustment to the back derailleur and a little more skill with the index shifters I will be able to master this 40+ year old derailleur. Here are the relevant pages for adjusting the "front changer" and the "rear derailleur gear" from the the Raleigh handbook. I suppose the Campagnolo gear went on the higher-ended bicycles. (I like the typography and the layout.)

From 1970 Raleigh Owners Manual (http://www.kurtkaminer.com/HB_70handbook.html)

How Do I Fix-Up the Super Course?


Ryan's blog also clued me into Velo Orange, a company with a go-slow, no-lycra, no-yelling vision for bicycles. My surfing also brings me to Rivendell Bicycle Works, which has a similar vibe and beautiful design. I am especially taken by Rivendell Catalog #20.

Against these carefully constructed, high-end, designerly, and playful brands I find this film: How a Bicycle is Made, 1945, set at the Raleigh factory in Nottingham, England.

Note the passive tone of the title of the film. I'm surprised and taken a back, although perhaps I shouldn't be, by the industrial processes that are required to make a bicycle in post war England - and I assume today - and the potentially de-humanizing work involved. I can't imagine how the workers in this film might interpret my investigations of the Super Course. Given their hard work in the factory, I feel unsettled that I get to play with the Super Course. At about 11 minutes 37 seconds into the film we see a worker packing hubs with ballbearings. The narrator says "This worker can fill over one thousand hubs in an eight hour day." Which is more than 2 hubs per minute. I'm stunned by the standardization of work and the human skill involved.

From Sheldon Brown, I also discover a community-oriented shop, Aaron's Bicycle Repair, where I learn a lot. I look forward to visiting and browsing the shop's library some day. I should also say that every three or four weeks I ask a question to the friendly people at Recycled Cycles on Boat Street in the University District, and I usually buy something when I do. Given their expertise, that only seems fair.

I soon learned that there are English, Italian, French, and Swiss threads for bottom brackets. Moreover, Sheldon Brown tells me that Raleigh had their own proprietary threading.  And so, and so forth.

If I follow Sheldon Brown correctly, since my Super Course crank is steel, with cotter pins, the bicycle was manufactured in Nottingham, England and the bottom bracket shell has the special Raleigh threading. Therefore, for simplicity, if I upgrade the bottom bracket and crank I might as well go with the Velo Orange Threadless Bottom Bracket, although Sheldon Brown outlines other solutions which seem to require greater technical skill and determined experimentation. At that moment, I wished I had a nearby community bike shop where I could talk this over with an expert.

During my web surfing I was unable to confirm that the Velo Orange Threadless Bottom Bracket would actually work on the Super Course. My measurement of the bottom bracket shell is somewhere around 70 mm. Later, on Velo Orange, I find this statement "Customers report that they also work in Raleigh frames with a 71mm wide BB shell." That was encouraging. However,  I interpreted "customers report" as a weak signal and I'm pretty sure that while my BB shell is not 71 mm.

Basically, I'm not really sure how to measure things and I don't have a sense for acceptable tolerances. Anyway, I shouldn't have worried. I eventually install it, and I can report that the Velo Orange Threadless Bottom Bracket works beautifully on the Super Course!

Here's what my Raleigh Super Course looks like on June 23, 2015, after about 120 miles of riding, including about 36 miles of Northwest forest road gravel. More about the gravel later.


The Raleigh Super Course Upgrade, Version 1.0, June 23, 2015

Friday, June 26, 2015

Perusing Craigslist for Bicycles


From time to time I peruse Craigslist for bicycles. In April 2015 I saw an ad for a Raleigh Super Course and some parts. Seventy-five dollars.

The seller was nearby, in Shoreline, north of Seattle, so my son, Eric, and I visit. As I looked at the bicycle, I'm thinking to myself "you ought to give me $75.00 to take this stuff away."

I'm not very good with bikes but I like trying. I notice the rims are steel, not aluminum. Lots of rust. The hubs, however, are aluminum, and made in France. The crank is steel and has cotter pins. The brakes are center pull, Weinmann, from Belgium. On the front and back are Huret derailleurs. I've never heard of those. The bicycle has a beautiful Brooks saddle.

I'm thinking: This is not likely to be a gem. Though, it might be fun to try to fix up. It might make a good winter commuter bicycle. Most days, I ride about 24 miles to and from work along the Burke-Gilman trail, North to South and back. I know how lucky I am to say this - the worst, cold, rainy, windy day is about 10 times better than driving a car. On really bad days, the bus is a good option.

The frame size is about right. Perhaps a little big for Eric; a little small for me but not too bad. The bicycle feels pretty heavy but there is a massive chain and lock on it, a kickstand, and a back carrier. That must add up to five pounds.

I say, "will you take $50.00?" He says "sure." And, Eric and I drive home with a bicycle and a box of junk. My wife is impressed, certainly not with the bicycle, but with the story that I bargained a little.

Craigslist Picture - Raleigh Super Course and Parts